Lydia arrived at 9:05 am 4 Feb. She weighed 7lbs 12oz and was 20 inches long. Everything will be posted on the main maxsons.org page shortly. I'm in the process of setting up Lydia's 1st website. The address (once my hosting company has added it) will be http://www.maxsons.org/lydia.htm
Solid Foods for a Baby
This is something I don't get. I thought I would post about it to see what anyone else thinks, and to try and find out what was done in the past (let's learn from the past). Anyway, on to the subject of this post…..
When did you start giving your kids solid foods? How did you do it? What did you start with? Why?
Why am I asking these questions? Well, because Cyndi and I are expecting, I have been doing some reading online and I'm confused. Why? It doesn't make sense. Let's start with this quote from WholesomeBaby Food:
Your baby may be 3 months old or 4 months old when you start to feel she may need "something more" than formula or breastmilk. Maybe she is beginning to awaken more often at night or eat more often than "usual" and you wonder if introducing solid foods may what she needs.
Ok….if the body is acting like it needs something more, doesn't it? Not according to the article. They say you need to wait until 6 months to give solids. But this is where I can't stretch my mind farther. The body isn't "ready" for life in the outside world when the baby is born either…the lungs haven't taken a breath, the stomach hasn't done anything, the eyes haven't seen anything….the list goes on. If you start solids, won't the body adjust? Of course it isn't ready….it hasn't had to adjust yet.
Then, I read this article on Dr. Sears' website where I learn that in "the past" kids started food at 6 weeks. Well, they all didn't die….we have people around today.
Anyway, I just don't get it.
Baby Countdown
I was reading on the internet and decided it would be neat if I could find one of those counter things to put up. I found one I liked….here it is:

Bellini Isabella Crib Assembly Notes
For some history, read this post on the Bellini Isabella Crib that Cyndi and I decided to buy. You’ll find out why we chose it over some others.
I assembled the crib this morning. There were soe differences between the instructions and what I saw. I wanted to post those on the internet just in case they may help someone else.
First off, the pictures in the instructions aren’t very clear. They look like a copy of a copy of a copy (like someone at the factory lost the originals several times).
In any of the pictures below, click the image for a larger version. You’ll also be able to download the full size image, if you need a closer look.
Before I started, I couldn’t tell which way was in or out on the head/footboards. The warning label goes on the inside. The inside has the 10 holes. The outside only has 4. Those 4 are near the bottom.
| The first picture wasn’t clear. The proper orientation is with the roller to the “front”. The front is the side you want out. Here is a clearer picture I took. The front in this picture is to the right. | 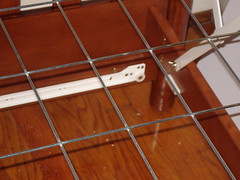 |
In step 3, when it says leave the bolts loose, it means loose. You’ll see why later on, but if I had to do it over again, I would only give the bolts 5 or so turns once the threads engage. You’ll need the slack when you go to put the sides on. Speaking of the sides, the picture in diagram 2 of the stabalizer bars isn’t clear. It shows what looks like a groove that will hold the dist cover. I didn’t have that, so I guessed on the part. The part you want is the one with the plastic tabs (there are three per “bar”…actually wodden side rails). Below is a picture:

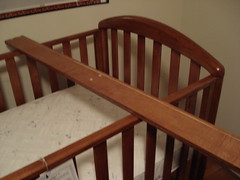
You’ll notice I took this after mounting the mattress. The tabs go on the bottom. This picture is taken from the front left of the crib looking to the back right corner. By the way, the dust cover is the big single sheet. The picture didn’t say what was what. I originally assumed that the big piece would be used for the drawer…. To see the dust cover, click here. To see the two pieces for the drawer, click here.
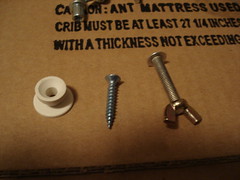 |
In step 4, it talks about using the H screws and G nuts. I didn’t have any bolts and nuts. What I figured out was I was supposed to use the bolts with the wing nuts. Actually, this may be a place to point this out…there were several fasteners that didn’t look as pictured. The picture to the right shows the ones that were different.
On the left is the plastic disc X^2 (X squared). In the middle is the screw X (the picture in the front of the manual shows it more like a bolt). On the right is the screw H with nut G. |
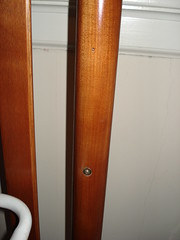 |
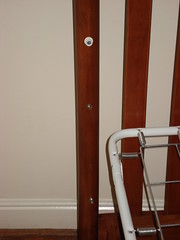
In step 6/diagram 5, it isn’t clear what goes where. There is a hole missing in the diagram. Bolt Y goes in the very bottom. Screw X and disk X^2 goes in the very top one (it is just a little pilot hole). The middle hole is empty. You’ll only use it in step 10/diagram 11 when you fix one of the sides.
The picture to the right shows all three holes while the one to the left shows the top hole for screw X and disk X^2 and the middle hole to fix the fixed side later on. |
 |
When you go to put the sides on, pay attention. The reference marks are simple indentations on the side. When I put the dropside on, I had it backwards and didn’t find this out until I tried it out. Instead of pushing the side in to get it down, I had to pull it out.
| When assembling the drawer, the instructions didn’t mention which was the back and which was the front. It was easy to figure out…the dark one goes up front while the light one goes in the back. The top picture is of the back while the one on the bottom is on the front. | 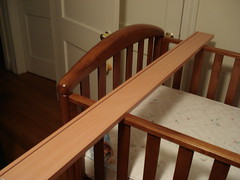
|
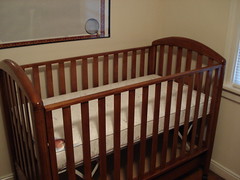
In the end, everything was successfull. Here is the completed crib:
[Update 2012-12-26 14:09:02] Edited picture links to use flickr
Stroller Thing
Well, Cyndi and I decided on a stroller thing. We had orginially registered for one, but then we decided to go to Babies R Us and try a few out. We decided to return the one that someone bought for us (thanks mom and dad) for a different model. We tried colapsing and uncolapsing all of them and this was the only (THE ONLY) one that colapsed with one hand and didn't fall flat on the ground when you did it.
After we use it for a bit, we'll post how we like it. Check back in January/February for more information.
 |
 |
| http://www.specialtybaby.com | http://www.jcpenney.com |
Crib
 |
Well, Cyndi and I bought a crib today. We had been looking around town and looked and looked and looked. We started at Babies R US, went to Wal Mart and Target then several other local stores. We saw lots of cribs. We saw lots of cribs made out of pressboard. We saw lots of cribs made out of MDF. We saw tons of stuff. AND they were expensive! I think the average price for pressboard at Babies R US was somewhere around $300. Can you believe it?!
Cyndi and I talked. I pointed out that I would rather spend a bit more and get real wood. I wanted something that would last through many many kids. I wanted something that would still be around when I was my grandparents age. I wanted something that could be used over and over and over again. Pressboard isn't that. So, we went looking for real wood. We finally stumbled on this store next to Performance Bikes in Richmond (I forget the name). They were having a sale (10% off) and all their stuff was 10% off. We ended up and spent more than we wanted, but we got a good looking crib made out of wood that will last forever (well, provided we take care of it). |
[Update 28 Dec 2006] I put our crib together today. There were some discrepancies between the instructions, pictures, and reality. I took some pictures and wrote a blog post about the assembly of the Bellini Isabella Crib.
Some more baby ideas
If anyone is looking for something to get us, feel free to shop at Cabela's. They have everything…even baby clothes.
Follow this link to see more baby items at Cabela's.
Below are some more interesting ideas about cribs and sheets, etc….
Interesting Diaper Bag
 |
Cyndi and I went looking at baby beds today. While in a local store, I saw some interesting diaper bags. They weren't the standard girlie mushy overflowing things that people normally have. I wrote the company name down and decided to look on their website. I don't know if we are going to get one or not (right now, they are rather pricey).
My main point in posting is to see if anyone out there has ever used one and what they think. Have you used one of the Fleurville bags? Leave a comment and tell me what you think. |
Baby Registry
Well, Cyndi and I went this evening to register at Babies R Us. If you want to see the registry, follow this link.
Random Baby Stuff
This will be a random collection of things Cyndi and I have been talking about related to baby stuff. If you want the details, read more…. Continue reading “Random Baby Stuff”