For some history, read this post on the Bellini Isabella Crib that Cyndi and I decided to buy. You’ll find out why we chose it over some others.
I assembled the crib this morning. There were soe differences between the instructions and what I saw. I wanted to post those on the internet just in case they may help someone else.
First off, the pictures in the instructions aren’t very clear. They look like a copy of a copy of a copy (like someone at the factory lost the originals several times).
In any of the pictures below, click the image for a larger version. You’ll also be able to download the full size image, if you need a closer look.
Before I started, I couldn’t tell which way was in or out on the head/footboards. The warning label goes on the inside. The inside has the 10 holes. The outside only has 4. Those 4 are near the bottom.
| The first picture wasn’t clear. The proper orientation is with the roller to the “front”. The front is the side you want out. Here is a clearer picture I took. The front in this picture is to the right. | 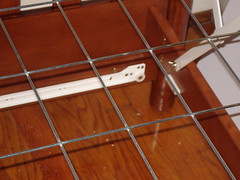 |
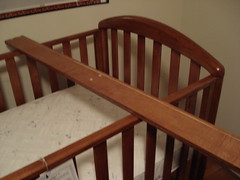
In step 3, when it says leave the bolts loose, it means loose. You’ll see why later on, but if I had to do it over again, I would only give the bolts 5 or so turns once the threads engage. You’ll need the slack when you go to put the sides on. Speaking of the sides, the picture in diagram 2 of the stabalizer bars isn’t clear. It shows what looks like a groove that will hold the dist cover. I didn’t have that, so I guessed on the part. The part you want is the one with the plastic tabs (there are three per “bar”…actually wodden side rails). Below is a picture:

You’ll notice I took this after mounting the mattress. The tabs go on the bottom. This picture is taken from the front left of the crib looking to the back right corner. By the way, the dust cover is the big single sheet. The picture didn’t say what was what. I originally assumed that the big piece would be used for the drawer…. To see the dust cover, click here. To see the two pieces for the drawer, click here.
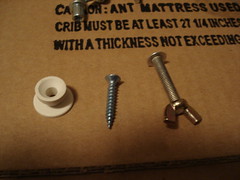 |
In step 4, it talks about using the H screws and G nuts. I didn’t have any bolts and nuts. What I figured out was I was supposed to use the bolts with the wing nuts. Actually, this may be a place to point this out…there were several fasteners that didn’t look as pictured. The picture to the right shows the ones that were different.
On the left is the plastic disc X^2 (X squared). In the middle is the screw X (the picture in the front of the manual shows it more like a bolt). On the right is the screw H with nut G. |
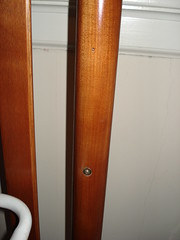 |
In step 6/diagram 5, it isn’t clear what goes where. There is a hole missing in the diagram. Bolt Y goes in the very bottom. Screw X and disk X^2 goes in the very top one (it is just a little pilot hole). The middle hole is empty. You’ll only use it in step 10/diagram 11 when you fix one of the sides.
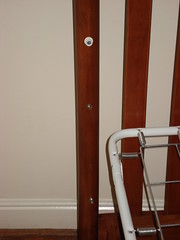
The picture to the right shows all three holes while the one to the left shows the top hole for screw X and disk X^2 and the middle hole to fix the fixed side later on. |
 |
When you go to put the sides on, pay attention. The reference marks are simple indentations on the side. When I put the dropside on, I had it backwards and didn’t find this out until I tried it out. Instead of pushing the side in to get it down, I had to pull it out.
| When assembling the drawer, the instructions didn’t mention which was the back and which was the front. It was easy to figure out…the dark one goes up front while the light one goes in the back. The top picture is of the back while the one on the bottom is on the front. | 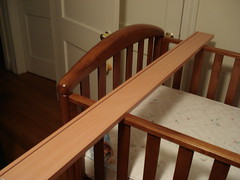
|
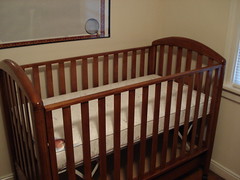
In the end, everything was successfull. Here is the completed crib:
[Update 2012-12-26 14:09:02] Edited picture links to use flickr